Why and how to ReactJS with Redux
The newest revolution in Frontend-Development is React a "JavaScript library for building user interfaces". It rides on the current trend of doing things more functional. With React comes on of these moments where we all ask ourselves:
Why haven't we always done it like this? it is so obvious now!
We shall continue to explore what exactly became so obvious, why that is amazing and then dive down the rabbit hole that is the React ecosystem until we have a boilerplate to create an application.
An introduction
React takes a simple enough approach:
For a given state describe how to render your application.
And that, right there is all the magic. There is so much beauty in this idea to only describe how to render your application for a given state. It is easy to reason about this. Have a state and represent that is a no-brainer while rendering with two way data binding and back and forth updating of state can get confusing.
When an event happens, users inputs things or servers return a result, we update the state and that triggers a redraw of the Component. Here the surprising thing is that this is actually fast. React achieves this by keeping a virtual DOM in memory, altering that, comparing it to the last one and updating only the changed parts of the actual DOM.
Go watch the introduction of React by Facebook that goes on to explain more about this.
For the sake of this article we will build a simple application where a button will be able to invert a displayed text. You can find the complete code on GitHub Let's learn how to do that.
JSX
React can be used with plain old Vanilla JavaScript. But there is JSX and it just looks so much better. What you do with JSX is write HTML like text to represent you application. So your main app might look like this:
import React from 'react'
import { render } from 'react-dom'

render (
    <div>
        Hello React
    </div>,
    document.querySelector('#app')
)
A simple React Component
A Component is a description of how to render a part of our application, like a button. Take a look at this button that displays some text and calls a function when clicked.
//A simple button component.
import React from 'react'

const button = ({text, click}) => (
    <button onClick={click} >
        {text}
    </button>
)

export default button
Here we are using Destructuring Assignment to achieve named parameters for our Component. That is why there are {} around the parameters.
Redux
And welcome to the rabbit hole :)
Now that we have a thing that renders the next step is to model the state of our application and changes to it. While your componences can in fact have internal state, it is much cleaner to have a global state and let your Components only do the rendering.
Redux is a predictable state container for JavaScript apps.
Redux to the rescue. This approach, or model, assumes that you have one big state called a Store and Actions that are being fired. When an action is fired they get parsed by so called Reducers and a new state is reached.
You can define multiple Reducers to divide your store with each Reducer taking care of part of it. For our sample application we will write a Reducer to take care of the text that is being displayed and one to handle the inversion. Thus our store will look like such:
{
    inverted: false,
    text: 'Hello React'
}
It is just a plain old JavaScript Object. It can of cause be more complex and nested.
One direction
Redux strong point is it's unidirectional dataflow. as you can see below data only flows one way. This makes reasoning about things so much more doable. There is no back and forth of two directional databinding. There is only a Store which is in a state that we can represent.
 Visualizing dataflow in Redux
Reducers
All Reducers will have the same signature (state, action), taking in the last state and the current Action. A Reducer will then check the action.type to see if it wants to act on this action and return a new state or the old one. It is important for a reducer to specify an initial state and always return the old state if it doesn't want to react to the action.
An initial state for each Reducer is important to generate the initial state of the Redux Store for our application. At the start Redux will call all Reducers with (undefined, {}) and expects to get a valid instance back. Since we are using ES6 we can handle this using default parameters like (state = 'Hello React', action).
Returning the old state is important for Reducer composition. This refers to building your store from more than one Reducer. In this scenario each Reducer still gets called for each action though only with the part of the Store they are responsible for. To build the entire Store a Reducer that does not which to act upon an Action should return the old state.
//The reducer for .text of our store.
const textReducer = (state = 'Hello React', action) => {
    if(action.type === 'SET_TEXT') {
        return action.text
    } else {
        return state
    }
}

export default textReducer
Creating the store
Now that we have Reducers we want to compose them together into a Store. As we will later add things to the creation of the store to do some logging lets keep things clean and first combine all Reducers together. Redux provides combineReducers to do just this.
import { combineReducers } from 'redux'
import inverted from './inverted'
import text from './text'

const reducers = combineReducers({
  inverted,
  text
})

export default reducers
Now we can use createStore, also provided by Redux, to create a Store from our combined Reducers. We will do this in our index.js main entry file by adding:
import { createStore } from 'redux'
import reducers from './reducers'

const store = createStore(reducers)

Using the store
To now use the Store for our application we wrap the application into a so called Provider using our Store.
<Provider store="{store}">
  <div>
    <Display />
    <button text="Invert" />
  </div>
</Provider>
Actions
Reduxes way to update the store are Actions they are created by so called Actioncreators. An Action is really just an Event with a single object as payload.
//Define and export an Actioncreator.
export const setInvertedTrue = () => {
    return {
        type: 'SET_INVERTED_TRUE'
    }
}

export const setText = (text) => {
    return {
        type: 'SET_TEXT',
        text
    }
}
The simplest Actioncreator creates and Action that only has a type. All actions need to have a type but they may have more payload ontop of their type. Actions can then be dispatched. For this Redux provides the dispatch method and we will mostly use this from user input so we will soon so where we get the dispatch method from. For now lets just look at how an Action is dispatched.
import { setText } from '../actions'

dispatch(setText('New text'))
React and Redux
Now we have React which renders a state of our application and is super good at that and Redux which models the state of our application. Lets get the two of them acquainted.
To let Components talk to the store we will wrap those that need to in Containers. Here we will use connect which is a magical function provided by Redux to use it with React. It takes two arguments mapStateToProps and mapDispatchToProps, two function that do exactly what they sound like they would. For our button from before this might look like this:
import { connect } from 'react-redux'
import button from '../components/button'
import { setInvertedTrue, setInvertedFalse } from '../actions'

//Map things from the state onto properties of the component.
const mapStateToProps = (state, ownProperties) => {
    return {
        inverted: state.inverted
    }
}

//Add a function that calls a dispatch.
const mapDispatchToProps = (dispatch) => {
    return {
        click: (inverted) => {
            if(inverted) {
                dispatch(setInvertedFalse())
            } else {
                dispatch(setInvertedTrue())
            }
        }
    }
}

const visibleButtons = connect(
    mapStateToProps,
    mapDispatchToProps
)(button)

export default visibleButtons
And here dispatch makes an appearance as Redux will provide mapDispatchToProps with the dispatch function. Another thing you might notice here is that we are passing the inverted from the state around. The button really only knows this so it can pass it to its click function and we can make the right dispatch. You will find that this is a common pattern. It might seem like a little overhead but this makes sure we can always think in our nice unidirectional dataflow and not access the state at weird and random places. You could also save this in the container in some way but maybe we want to replace the container at some point and keep using the component, so lets put this information there.
Staying pure
You might have heard the term pure function together with React and Redux. A puer function is one that:
- Always returns the same result given an input
- Does not have any side effects
So a function that does not alter state of other things or preferably state at all but takes an input and produces an output.
We can gain a lot by using pure functions in the context of Redux and React. Mainly by writing Components and Reducers as pure functions.
Pure functions will grant us testability and later the ability to "timetravel".
Pure Components
All examples here are actually pure functions. The Components do not keep state themselves. Anything statefull gets put into the Redux Store and handed to the Component as a property. This makes Components really easy to test as we can just give them a state and can look at how they appear. It also makes them easy to reason about because we are just thinking about a unidirectional flow of data to representation.
This is not to say that Components should have no logic within them. It might make perfect sense to calculate something from an input instead of . But a Component should only change state by dispatching events. This way the store remains the single truth of our applications state.
Pure Reducers
Pure Reducers will allow for many awesome things. First of which is testability. To ensure that a function returns the right thing given an input can be automated very easily. Even more so when it does not depend on anything else. (Has no side effects).
This mainly means that Reducers should not alter the current state but return a new object. By doing this we can also later implement things like skipping back to a certain state we where at before. Since only Reducers that make changes return new objects this approach stays memory efficient. Wanting to say it does not take up as much storage space as you think as we maintain part of the old structure and simply pointers to new and old parts. There are people who explain this way better than me. Like the Redux FAQ.
A great help in writing pure Reducers is the ES6 Object.assign which allows us to create new Objects. A common thing you might do is iterate over an array of objects and change a single object within the array. Lets say we have objects with an id and text property and want to update the text of a single object in a pure way.
//Store is actually only the part of the store this reducer is responsible for.
function updateTextForId(store, id, newText) {
  return store.map((obj) => {
    //Find the one object we want to update.
    if (obj.id === id) {
      //Create a new object only where it is needed with the updated text.
      return Object.assign({}, obj, {
        text: newText,
      })
    } else {
      //Else just use the old object.
      return obj
    }
  })
}
Implement a feature
Using something like React or Angular or any other big popular framework frontload a lot of the pain. The gain comes now. Implementing something new now always follows the same schema. I can tell you how to implement anything ever from this point.
- Build a Reducer
- Build a Component
- Connect them
That is literally how you implement anything that you want to add to your application. This makes the effort it takes to implement a new feature quite small and maybe even more importantly enables you to give a good estimate as to how long it takes to implement a feature. It also guaranties you that there are a few simple and contained steps to follow in order to get something to work.
Structure the code
Here is how our code is structured so far including tests and documentations still to come. As you can see especially JS files are structured according to their purpose into Reducers, Components, Containers and Actions. This structure helps us find the file we want to work on faster.
.
├── build                          The compiled code
│   ├── index.html                 A way to actually see your app
│   └── js
│       ├── main.js
│       └── main.js.map
├── docs                            Documentation
│   ├── actions                     For Actions in the app
│   └── config                      Config files to generate documentations
│       └── action.config.json
├── node_modules                    Dependencies
├── package.json                    Configuration of your project
├── README.md
├── src                             Stuff your write and resources go here
│   └── js
│       ├── actions                 Redux Actions
│       │   └── index.js
│       ├── components              Pure React Components
│       │   ├── button.js
│       │   └── textDisplay.js
│       ├── containers              Connecting Components to Reduxs store
│       │   ├── visibleButton.js
│       │   └── visibleDisplay.js
│       ├── index.js                Entry point of our app
│       ├── loggingMiddleware.js
│       └── reducers                Redux Reducers
│           ├── index.js            Here Reducers get combined
│           ├── inverted.js         A single Reducer, a part of the store
│           └── text.js
├── test
│   ├── reducers                    Testing individual Reducers
│   │   ├── inverted.js
│   │   └── text.js
│   └── test.js                     Entry point for all tests
└── webpack.config.js               Configuration for webpack
Further down the rabbit hole

Before we finally get to actually see the results of our work I would like to point you to a few things you should consider when building an application with React.
React Router
react-router is a complete routing library for React. It does just what it promises, you can use it to build a one page application using JavaScript to route your user and keeping the URL working. All the good stuff.
React Router Redux
react-router-redux keeps your Redux store and router state in sync. Only use this when you need it ;)
Asynchronous Actions
Now this is something most people will need. So far all of our Actions work synchronously in the sense that they get dispatched and get handled. But what if you want to get data from the backend?
Well you could build some helper that gets the data and then dispatches an action when it is done. Or you could use actions to do that. If you want to use Action for this go read the docs and get the thunk middleware.
Normalization
You build your Redux store, you put a lot of up-front thought into how it should be structured. And then a few weeks into development suddenly some objects are deeply nested into others and you spend half your time finding the objects belonging to one another and extracting sub-objects. It is time to normalize your data.
Wether you get normalizr to do the job for you or do it yourself. It is time to extract those deeply nested objects, give them an id and reference that id.
Doing this will make it easier for your Reducers to consume your data and will disentangle your thought processes.
Buildprocess
Let me see what I build!
Because we are using many awesome features like JSX and ES6 here that are not natively supported by browsers (yet) we need to transpile our code at some point. My prefered way is webpack to get this job done. Simply because there was a preset for React and I can manage to hack the rest together somehow.
To use webpack we set up a webpack.config.js file in the base of our filestructure. This file will contain the standard configuration to run webpack with. You can find my basic file in this gist. Once that is set up all we need is webpack and a way to run it. As with all things i prefer to keep webpack as a dependency of this single project and then use an npm script to run it.
First install all the dependencies. React itself, Redux, webpack and babel which does the actual transformation.
npm install --save webpack babel-core babel-loader babel-preset-es2015 babel-preset-react react react-dom redux
//Define a script to run the local webpack with pretty colors and watching for changes.
"webpack": "node node_modules/webpack/bin/webpack.js --progress --colors --watch"
Now you should see something like the below output when running your new script.
$ npm run webpack

> react-basic@0.1.0 webpack D:\react-basic
> node node_modules/webpack/bin/webpack.js --progress --colors --watch

Hash: 9f2265bc4db2c1e07831
Version: webpack 1.13.1
Time: 1810ms
      Asset    Size  Chunks             Chunk Names
    main.js  727 kB       0  [emitted]  main
main.js.map  849 kB       0  [emitted]  main
    + 172 hidden modules
Seeing your work
To actually see what I am building I tend to put an index.html into my build folder and server that using live-server. To set this up we once again install the dependency and set up a npm script.
npm install --save-dev live-server
"serve": "./node_modules/.bin/live-server ./build"
<!-- index.html -->
<div id="app">

</div>

<script src="js/main.js"></script>
While it will render if you only put this in your index.html, do add the head and body tag ;)
$ npm run serve

> react-basic@0.1.0 serve D:\react-basic
> live-server ./build

Serving "./build" at http://127.0.0.1:8080
All together now
Do we really need to keep two console windows open to run those scrips we just created? Of cause not.
Just use concurrently to run both of those scripts at once. At this point I would like to credit Stackoverflow.
npm install --save-dev concurrently
"dev": "node ./node_modules/concurrently/src/main.js --kill-others \"npm run webpack\" \"npm run serve\"",
Debugging
In the current day and age we are lucky enough to have powerful devtools build into our browsers. So apart from learning how to use them (did you know Chrome supports breakpoints?) here are a few things that will help you debug.
Sourcemaps
Using source maps allows developers to maintain a straight-forward debugging environment while at the same time optimizing their sites for performance.
This conclusion by Matt West sums it up quite well. We compile all our code into a single bundled file using webpack and sourcemaps help us to know where an error is. In practice using sourcemaps will enable us to see in the devtools of our browser in which file a line of code is that failes instead of getting line 37569 in bundle.js.
In Chrome devtools you can also hit Ctrl + P to open any source file and look at it. Even set debugging breakpoints in those files and the browser will break when this line in the bundle gets reached.
If you follow the webpack config linked above you will get sourcemaps.
Logging middleware
Redux can be extended using middleware. That same page suggests how to implement a logging middleware. I put that into a gist. You can then use it like such:
import { createStore, combineReducers, applyMiddleware } from 'redux'
import { logger, crashReporter } from './loggingMiddleware'

let store = createStore(
  reducers,

  // applyMiddleware() tells createStore() how to handle middleware
  applyMiddleware(logger, crashReporter)
)
This will give you output on the console showing you what is happening in your app. For our little test application you might see something like:
next state
 Object {inverted: false, text: "Hello React"}
dispatching
 Object {type: "SET_INVERTED_TRUE"}
next state
 Object {inverted: true, text: "Hello React"}
Devtools
There are several tool out there that you can get to help you develop with React and Redux.
I definitely advice you to get the React Developer Tools. They give you an overview of all currently rendered Components and what properties they where given. This way when something looks weird you can see which property is different from what you expected.
The Reduc DevTools are really powerful. And a pain to set up. They are a nice way to look at things and I encourage you to look at them but you can probably live with the logging middleware and not go through the trouble of adding this to you application.
How to debug
When you look at a problem with an app build on React and Redux there are three types of possible problems:
- Rendering errors
- State miscalculation
- Problems connecting the Store to Components
And this right here is one of the awesome things we get from using React and Redux and thus separating the concerns of handling the state and display of our application. Whenever you find a bug it will be withing those three categories. Let's look at how to find out where your problem lies.
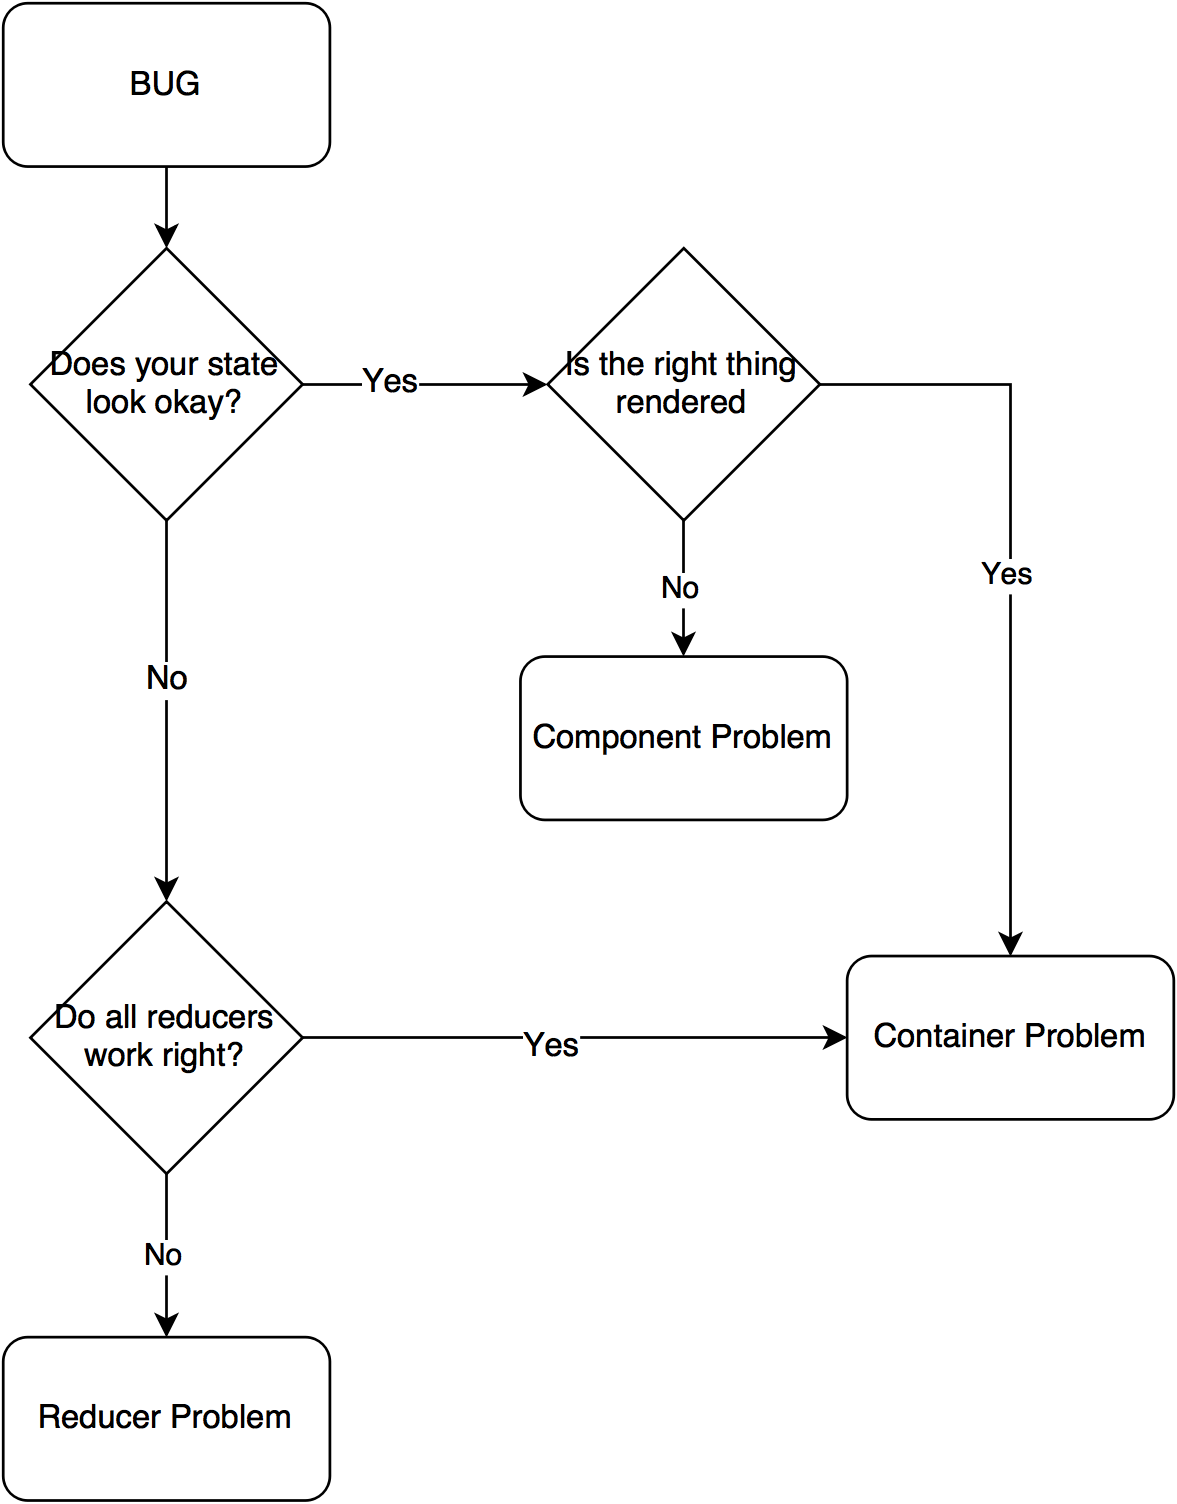 Basic flowchart to find the source of a bug.
1 Rendering
Get your Component on it's own and look at it with different inputs. Well that is the manual way. A more sophisticated approach will be to use the React devtools to look at what input the Components gets. I find that usually my Component either displays the wrong thing but is given the right thing or got the right thing in which case I look at a problem of case three.
2 State
Use your logging middleware or the Redux devtools to find the Action that caused the state to go wrong or the place where an Action is not being dispatched in which case this is a case three problem.
When an Action updates the store wrong you should look at the corresponding Reducer. Probably best to write a test for that.
3 Connecting
This is easiest to get wrong. Fire the right action for everything, fire the action at all, hand down the right properties from Containers through Components. Many things can be bugged here but once you know that it is a problem with connecting Components and Store you will surely find the problem.
Testing
The thing every developer dreads and fears and management sees as an unneeded waste of time that could be spend working, after all the program is running, is it not?
Testing Reducers
We kept all our Reducers to be pure functions this means they are ideal for testing. They don't depend on anything else just themselves and their input. And do you remember from debugging that one of three sources for bugs are Reducers? Or the way your Store is changed? Well testing Reducers can get you pretty sure that they are doing what they are supposed to. Effectively getting rid of one of three sources of bugs.
The videos to get started with Redux actually do a good job at showing how to test Reducers. My approach is highly influenced by that. We will be using Tape as our testing "framework". It is a lightweight testing harness for JavaScript that provides only a handful of assertions and produces TAP output. Read this gist about using Tape to get familiar with it. Or just follow along for a quick start on how to use it to test Reducers.
Setup Tape
Once again install dependencies and create a npm script. Here we also add something to make the TAP output look nicer.
npm install --save-dev tap-spec tape browserify babelify deep-freeze-node
"test": "node ./node_modules/browserify/bin/cmd.js test/test.js -t [ babelify --presets [ es2015 react ] ] | node | tap-spec"
This is a bit more to once again transpile ES6 and to be able to use import as well as require in our tests. We will be using deep-freeze-node to ensure our reducers return new Objects. Let us test the text Reducer.
const freeze = require('deep-freeze-node')

//Import the Reducer and ActionCreator.
import textReducer from '../../src/js/reducers/text'
import { setText } from '../../src/js/actions'

module.exports = function testText(test) {
    test('Text', function(t) {

        //Test the initial value.
        const store1 = textReducer(undefined, {})
        freeze(store1)
        t.equal(store1, 'Hello React', 'Initial Value correct')

        //Test the setting of a new value.
        const secondText = 'Hello World'
        const store2 = textReducer(store1, setText(secondText))

        //Allways freeze new stores.
        freeze(store2)
        t.equal(store2, secondText, 'Can set the text')

        //All tests are done.
        t.end()
    })
}
I like to organize my test files into single files for each Reducer and connect them in a single entry point at test/test.js.
const test = require('tape')

require('./reducers/text')(test)
And now we can run the tests using npm test to get a nice report.
$ npm test

> react-basic@0.1.0 test D:\react-basic
> node ./node_modules/browserify/bin/cmd.js test/test.js -t [ babelify --presets [ es2015 react ] ] | node | tap-spec

  Text

    √ Initial Value correct
    √ Can set the text

  total:     2
  passing:   2
  duration:  1.1s
Documenting
Yet another thing that no one in real life ever has the time for. The standard to document JavaScript is pretty much JSDoc. Go have a look at that if you want to document your application which is a nice thing to do ;)
I want to talk about how I document Actions for Redux. Actions themselves are nothing JSDoc knows about but it knows events. That is why I decided to document all Actions I dispatch as events. Finding that it helps to know all the Actions I can dispatch. Because I created a lot of Action and knowing myself next week or definitely when I have to fix a bug in two weeks I will not remember all of them. Reading a nicely formatted documentation is easier for me than finding the types of Actions I have Actioncreators for in my code.
/**
 *   A redux action fired in the System.
 *   @typedef     {Object} Action
 *   @property     {String} type         - The type of action.
 */

/**
 *   Set the currently displayed text.
 *   @event     SET_TEXT
 *   @type        {Action}
 */

export const setText = (text) => {
    return {
        type: 'SET_TEXT',
        text
    }
}
So I first define myself a type of events that I call Action of which I then use to define events. Take note that Actioncreators should be documented separately if you wish to do so because they are different from Actions, something the Redux documentation likes to go on about.
Setup JSDoc
And here go some more dependencies and npm scripts. This is setup to document different things through different configurations. I usually also like to create markdwon documentations to include in readmes. You can read more about how I usually document JavaScript.
npm install --save-dev jsdoc docdash live-server
"jsdoc-actions": "./node_modules/.bin/jsdoc --configure docs/config/action.config.json --verbose",
"serve-docs": "./node_modules/.bin/live-server ./docs"
#AWESOME
WE MADE IT!!!
There is a basic React app running using Redux to maintain the state of our application. And we even have tests and Documentation going.
Now you can "start" to build an application. I know this has been a lot of pain. But trust me we are frontloading a lot of the development pain here. And hey you can get the repo on GitHub to get all this free of effort.
I hope that you see the greatness of this setup. How nice and easy it is to reason about this approach how greatly it streamlines development and debugging.